 Adjusting saddlefit The following information relates primarily to dressage and all-purpose English-style saddles, but the principles are the same for all saddles. For example, western and park saddles often sit too low at the withers. Just throwing on a thick pad may actually aggravate the problem in some cases. And I see too many jumping saddles propped up on the horse's withers. The following technique is intended to help fit saddles already purchased, but understanding how to adjust saddle fit can improve your ability to determine the suitability of a new saddle.
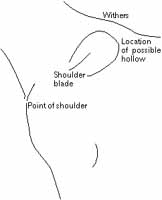
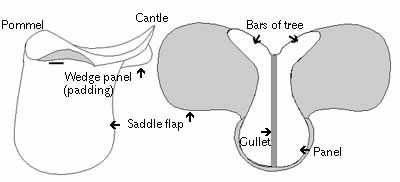
1) Place the saddle on your horse with a regular saddle pad/blanket. Don’t use thick pads. The saddle should sit with the bars of the tree just behind, not on, the top of the shoulder blade. There may be a hollow right there. This placement may be further back than you’re accustomed to. However, this position allows the shoulder to move, and avoids having the saddle sit only on the front and back of the tree which would create pressure at these points and cause pain and soreness.
2) The padding should not touch the horse’s spine at any point. If it does, the gullet is too narrow for that horse. If the roof of the gullet touches the horse’s spine, the gullet is too wide. Stand on something to sight down the gullet from front and back so you can see how it fits. In the withers area, the gullet should clear the spine by at least a finger’s width on each side, or it will cause discomfort when the horse bends. 3) If the front of the saddle (pommel) does not clear the top of the withers by at least 2” (this will decrease once you’re mounted but there should still be a good inch to spare) then you will have to raise the saddle with a thicker pad, preferably one that is cut out at the withers, and is thinner in the gullet area. Cutback saddles also need this clearance. If a thicker pad puts pressure near the spine, then use two “shims” that sit either side of the spine, and under the saddle panels, well clear of the spine. 4) The saddle should sit on the horse’s back with the deepest part of the seat near its centre. If, instead, you find it is back near the cantle, the pommel is too high and your saddle may be too narrow for your horse. If the problem is not too severe, you may be able to lift the back of the saddle with a lift-back wedge pad (not a keyhole pad) but this is not ideal and may put pressure on the withers. Raising the whole saddle may help in some cases, but if the saddle is too narrow there isn't much you can do to make it fit. If the deepest part is too far forward, use just enough extra padding under the bars of the saddle to level it out.
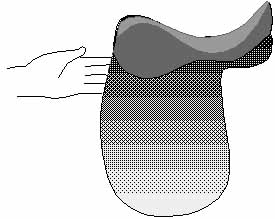
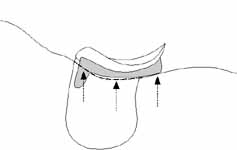
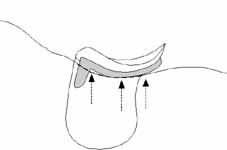
5) With the girth very lightly buckled, slip your hand, palm facing you, under the front of the saddle behind the horse’s shoulder, and slide your hand down from the pommel to the bottom of the flap. Repeat on the other side. If both sides feel very tight anywhere in this area then the front of the saddle needs to be raised. If this puts the saddle out of balance (see item 4), then instead you may need to raise the whole saddle with a thicker pad, and then repeat steps 4 and 5. 6) If one side feels tighter than the other anywhere in this area, then the looser side needs extra padding under the front of the saddle panel or bars, where it is loosest (there may be a hollow area there). This will lift the saddle slightly on the horse’s hollow side to release the pressure on the opposite side. If it doesn't, adjust the positioning of the extra padding, perhaps placing it lower, or try a double thickness, staggered slightly to avoid too thick an edge. Check again to see if you’ve padded enough. It’s best to only partially correct it to give your horse a chance to use his shoulder better himself, but correct it enough that most of the tightness is eased. It is important, however, not to restrict movement in the area around the top of the shoulderblade. Tightness in this area may promote loss of muscle tone around the withers. 7) Once you’ve checked the fit thus far (and added some padding if necessary), run your hand, palm side up, up behind the saddle flap under any pads and carefully feel along the horse’s back under the length of the tree. Do it on both sides. If there are hollow spots (see image below), extra padding is required across the back in those areas (or ideally have your saddle restuffed. Or you may need a saddle with a more convex {rounder} shape to its underside.)
If the front of the saddle and the whole length of the tree feel comfortably snug the fit is probably OK, although a looser fit at the withers is desirable. It’s not OK if you can easily run your hand under the front and back of the saddle, but you can’t half way along the tree. This probably means that the underside of the saddle is more curved than the horse’s back (see image below), and may be the wrong saddle for this horse. Many so-called warmblood saddles have this shape.
Your saddle may also be unsuitable if, after correctly adjusting the saddle, the panel at the back of the saddle comes off the horse’s back in front of the cantle (see image above), instead of supporting the saddle on the horse’s back, although in this instance having a saddlemaker incorporate a wedge panel into the padding may solve the problem. 8) Run your hand under the back of the saddle on both sides. It should touch the horse without gouging his back. If both sides are very tight, the front of the saddle needs to be lowered slightly, or perhaps moved back very slightly. If one side is tight, the front of the saddle on the opposite side needs to have some padding removed. If one side is barely touching the horse (but the other is OK) then the front on the opposite side needs more padding. If, with the girth firmly secured, you can easily lift the back of the saddle, the front of the saddle may need more padding, or again the underside of the saddle may be too convex for your horse’s back. Always check the results of changing the padding, and don’t give up if it doesn’t fit properly right away. Remember to check both sides of your horse, because his two sides may not match perfectly. If you’re having trouble keeping
your saddle in place, keep in mind that it will tend to
move to where it needs to be on the horse’s back. If
in spite of following the steps outlined the saddle still
slips, consider the possiblity that it is just the wrong
shape for your horse and you will both be better off with
a different saddle. And remember, there is no substitute for a correctly fitting saddle. I recommend starting with a custom-fitted saddle, and use these tips to keep it fitting so the horse is comfortable. Previous
UNDER CONSTRUCTION - CHECK BACK SOON | Riding Theory Main Page | Asymmetry | Maximizing Saddlefit | Who needs to check saddlefit? | Adjusting saddlefit | Email : rafalet2ride@yahoo.ca | Home | Lusitanos | Equine
Biomechanics & Riding Theory
| Last updated July 11, 1999 All rights reserved |